Desperate to find ways to stay engaged with fly fishing but can’t get out onto the waters you love? In a phenomenally written article for the New York Times, Jon Gluck details a weekly ritual of his, fly casting in the middle of an NYC street in front of his apartment. Jon revels in the peculiarity of his weekly ritual saying:
“But on the particular days I’m describing, my next move isn’t so familiar: I plant myself in the middle of West 12th Street and commence fly-casting — essentially fly-fishing without the fish — slinging 30 or 40 feet of thin nylon line behind me and in front of me, over and over again while stepping in and out of the street in sync with the traffic-light cycles to avoid passing cars, like some kind of bastardized urban version of Brad Pitt in ‘A River Runs Through It,’ God and Norman Maclean forgive me.”
The entire article is well worth a read and dives into the history of “Fly Casting” as a competition and as a means of recreating and relaxing during the COVID-19 outbreak in NYC.
Throughout your life as a fisherman, I’m sure we can all reflect on a time where our “money” fly was shredded due to an incredible bite. Whether or not this has ever happened to you, we can all agree that securing your wraps while tying flies is crucial. While the half-hitch will get the job done, the whip-finish holds its ground as one of the most secure knots to finish off your flies. This knot acts as a slip knot and when tightened it rarely comes loose. There are plenty of tools on the market to aid in the whip finish process, but the only tools you really need are simply your hands. In this tips and tricks tutorial, Tim Flagler of Tightline Productions demonstrates how to whip-finish while only using your hands.
How to Whip Finish with Your Hands:
Start by pulling down your bobbin to expose three to four inches of tying thread.
Lay the tips of your index and middle fingers on top of the tying thread.
Pull the bobbin up with your left hand and over top of your fingers as you rotated them until your pads face you.
Keep the thread from your bobbin in line with your hook shank.
Rotate the pads of your fingers away from you and the thread from your middle finger should lead straight back toward the bobbin.
The thread from your index finger should be roughly perpendicular to the hook shank.
Push your index finger away from you and as you wrap your fingers under the shank, turn the pads of your fingers so they are facing you.
Continue this wrapping process five to six times.
When finished, release your middle finger and pinch the loop between your thumb and index finger.
Pull the bobbin to tighten the loop to the hook shank.
The hand whip-finish technique is a great process to learn especially in a pinch or if you forgot your tool. Now, take your freshly tied fly to the river and hook some monsters! Tight lines!
Mike Salomone is a fly fishing guide in the summers and art teacher during the school year. With some more time off than usual earlier this summer, he decided to paint his buddy’s 26-year-old Willie Aluminum drift boat to give it a little facelift. Here are the photos and captions of his project.
The 26-year-old Willie drift boat was stripped down to the bare metal.
The floor rivets were removed. And the stripping continued on the inside of the boat.
Two different tones of Primer were applied to the top and bottom.
I made a brush for creating the lines for the scales by inserting eight small brushes into a piece of corrugated cardboard.
A test spot was painted to illustrate my idea for the brown trout to the owner.The light-colored halos were stenciled first.The black spots were then stenciled over the light halos.The port side after the spots.
The starboard side spots.The owner’s daughter wanted a Rainbow trout on the inside. Starting to lay down color.
The framework for under the floor.
Applying the spots for the rainbow trout pattern.The inside of the boat with the rainbow trout pattern before reinstalling the floors.
The rainbow trout from the bow.
The brown boat with the rainbow trout on the inside.
The diamond plate flooring was then riveted back onto the frame.
Seats were reinstalled.First float for the owner’s family on the Colorado River.
Prepping the brown boat for the christening float out of Rancho del Rio on the Colorado River.Brown boat reflection in the Colorado River.The brown boat in action on the Colorado River.
Article and photos from Mike “Sal†Salomone is a veteran fishing guide and writer based in Vail, Colorado. Be sure to check him out on Instagram at @mikesalomone88 or online at www.michaelsalomone.com. He can be reached at adventuresal@yahoo.com or by calling Vail Valley Anglers at 970-926-0900.
It seems like out here the flowers bloom a little brighter and the grass grows just a little bit taller…
If you’ve ever driven through Independence pass in Western Colorado, you understand how difficult it is to put the sheer magnitude of it all into words. Between towering mountains of sheer rock and swaying alpine groves, a small sliver of a road shoots through a canyon guiding travelers to and from Buena Vista and Aspen.
As our car glided over the narrow stretch of what could be loosely considered road, I couldn’t help but drift into a hypnotic state as I surveyed each mountain. Analyzing each scree slope, each bluff, each grove of Aspen trees as they danced in unison. As leaves convulsed in the wind, my mind drifted back over the long road by which we had come. Back towards the swells of the ocean underneath our skiff and the calming touch of the sunlight gently warming my shoulders.
After what felt like a few hours of staring off into the complex nature of the geography around me, the mountains began to part, and the small, yet lively town of Aspen gradually came into view. Around us, folks wearing masks and expensive dresses occupied every corner and sidewalk of the little ski-town. Smells of delicious food and sounds of exuberant conversation and laughter spilled into the car as we crawled from stoplight to stoplight. This wasn’t the place for us however, we had our sites set on Snowmass Village, where I and a few friends had taken up residency over the past 6 months. We didn’t have much time to stop anyways. We were going fishing tomorrow.
When my eyes opened to the warm Colorado sunlight the next morning, I let out an initial gasp in confusion as to where I was. It took me a moment to remember that I was back in Colorado, and for the first time in a few weeks, wasn’t waking up on a couch.
Our plan was simple. Grab some friends, some drinks, and hike up to an undisclosed high alpine lake in pursuit of some coveted Greenback Cutthroat trout. Without delay, my team and I gathered our gear (and some Tupperware for the boys who had, of course, forgotten to eat breakfast), and we were off. It didn’t take long before the road turned to gravel, and gravel turned to dust as we pulled up to the base of the hike. There, waiting for us with rods in hand, were a group of friends eagerly awaiting our arrival. A smile crept across my face as I realized I was back in the company of adventure.
The theme of the hike: Up. I would like to blame my slow speed on elevation adjustment, but truthfully it was just a bad case of having sat in a car for too long, tied in with a general lack of athleticism. However, the hike was a blast. On our breaks, Meris and I would allow ourselves to be left behind by the group as we rolled around in wildflowers and bounded ourselves to the earth under the force of our own laughter.
By the time we reached the top, our chests hurt from laughter and our legs shook under the unfamiliar demand of hiking many miles uphill (I miss the flats). As we edged the circumference of the crystal clear high alpine waters, we watched as red-bellied trout circulated the shoreline, only stopping to come up and sip an unsuspecting caddis.
As our party nestled together amongst the trees and rocks that surrounded the lake, we eagerly began to tie on our rigs. For me, it was a small elk hair caddis with a Perdigon nymph dangling just a few feet under. As I stepped up to the water’s edge, I could hear the crack of cans and rustling of sandwich paper behind me. It was clear I was up to bat, and I certainly had an eager audience.
It didn’t take many casts before an eager trout came up to demolish my caddis. With a quick set, I felt the tension of the wild fish as it thrashed in confusion. I fought it for a few seconds before the barbless hook popped out of his lip and flew into the air. With a violent splash, he jetted back into the mysterious dark blue depths of the lake. I was sad to have lost the fish, but it wasn’t long before I hooked another, this time on the bottom fly. This time, the fish was not the victor of the fight.
As the sun began to sink behind the trees, we descended back down to the cars and began to make our way back into civilization. On the ride home, Meris, company, and I laughed and reminisced on our experiences of the day as we massaged our sore joints.
Later that evening, our hiking party all met back up around a bonfire in a friend’s backyard. Underneath a cathedral of glistening stars, music and jubilee filled the air. As I looked around to see my friends entranced in the beauty of the gentle moment, I couldn’t help but allow my sense of contentment to drive yet another smile across my face.
Next to me sat Meris gently humming along to the gentle tune of the songs being sung. She was my co-pilot, my partner in crime, my adventure buddy, and soon, she’d be leaving me to head back to Texas. I felt the knot begin to form in my throat when I thought about saying goodbye, as those two words would mark the end of our adventure. However, as I looked around at my friends, some new and some old, I realized that the adventure was only just beginning.
Thank you to our family and friends for your constant support, as well as those who allowed us into your homes and on your waters to make this adventure possible.
Also, thank you to The Long Drink for helping fuel this adventure. The Long Drink is an iconic alcoholic beverage that is a top taste of Finland, it’s now available in the USA. Click here to learn more and find your closest retailer.
Modern fly lines often come with a welded loop that allows an angler to quickly switch out leaders with a loop to loop connection. This process is significantly faster than attaching your leader to your fly line via a nail knot. Unfortunately, over time dirt, sun, salt, bug spray, and sunscreen can all have degrading effects on a fly line and the welded loop regardless of how much time and care you put into maintaining your line. The welded loop on a fly line is often the first point of failure as it receives a bulk of the stress applied to the line when you’re hooked up with a fish. Have no fear, you can easily repair your fly line (even on the water) with the tips and materials below.
Required Materials:
Damaged Fly Line
Knife/Razor Blade
Aquaseal (Optional)
Superglue (Optional)
2/32″ Heat-Shrink Tubing (approx 1â€)
Lighter/Heatgun
Removing the Failed Welded Loop
The core on most coldwater fly lines is a braided material similar to backing. Once the exterior fly line coating has worn away, your line will begin to absorb water and sink which can be catastrophic if you are fishing a floating line. These steps should help you extend your day on the water if not the life of your line for many trips to come.
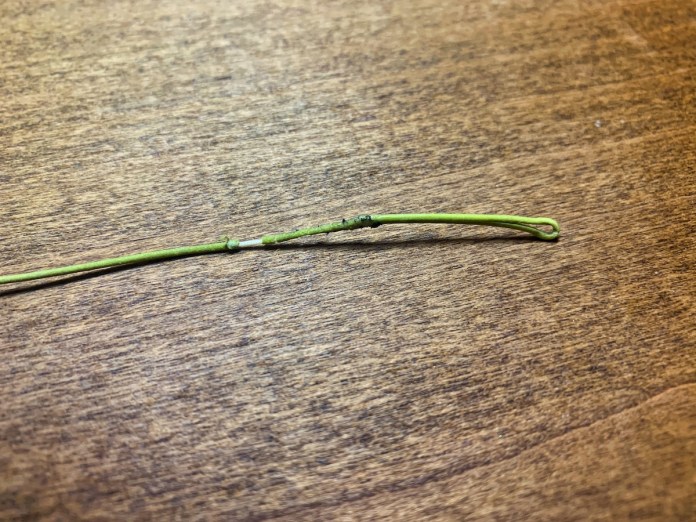
The line pictured above has served me well but it has seen one too many applications of super glue and Aquaseal and is in need of a serious repair.
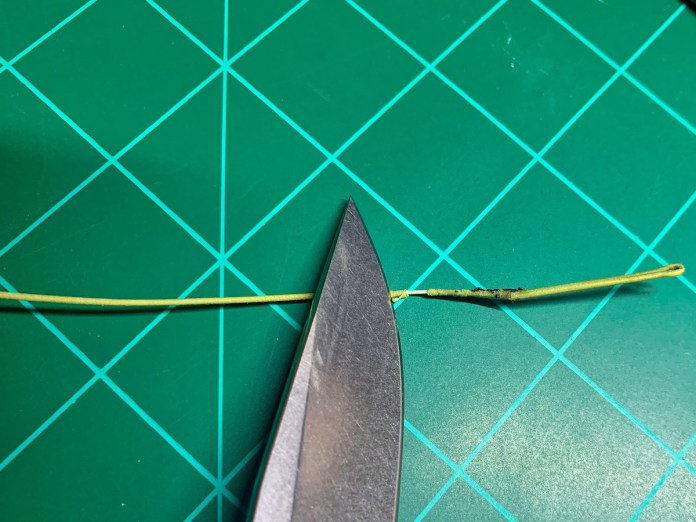
The first step in repairing your fly line is to remove the failed welded loop and any additional fly line that may be cracked or damaged.
Tip: Once you have cut off the old loop and damaged line, place a drop of Aquaseal on the exposed end of your fly line core to prevent it from absorbing water.
Creating a new Welded Loop
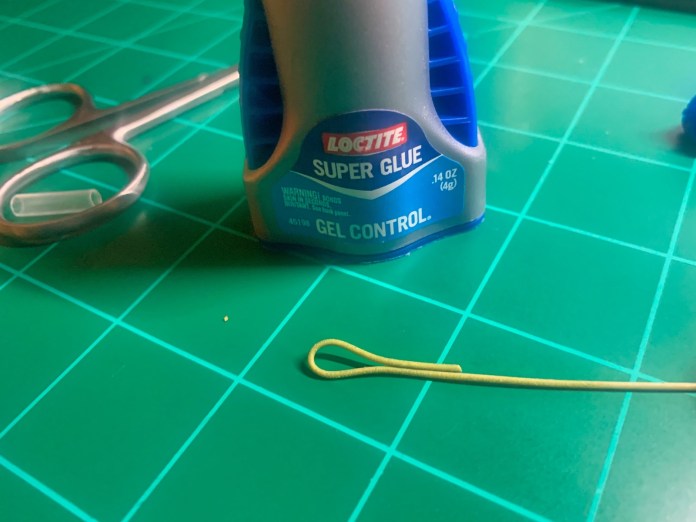
Once you have removed the damaged line, double over the line (approx. ½†of overlap) to create a new loop. Placing a drop of superglue on the line will help maintain the correct position of the loop while you work.
Using superglue isn’t required but it helps ensure a clean end result.
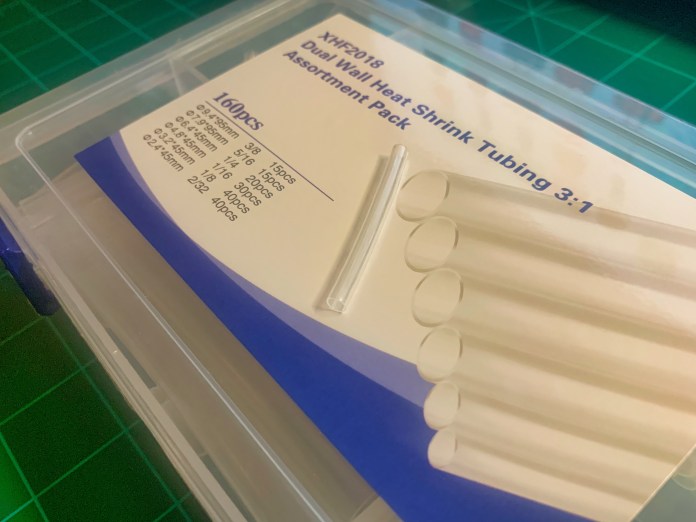
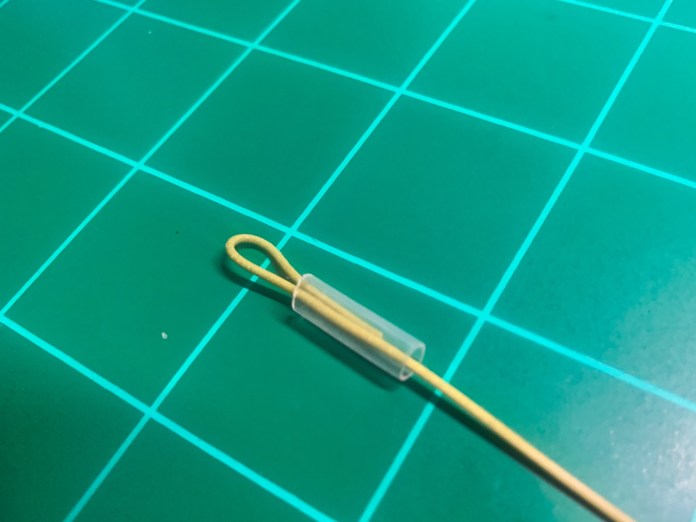
2. Next, cut a ½†long piece of 2/32†diameter heat-shrink tubing.
I used the smallest size heat shrink tubing in this package,2/32″.
3. Slide the ½†piece of heat shrink tubing over the new loop that you have created extending past the doubled-over line.
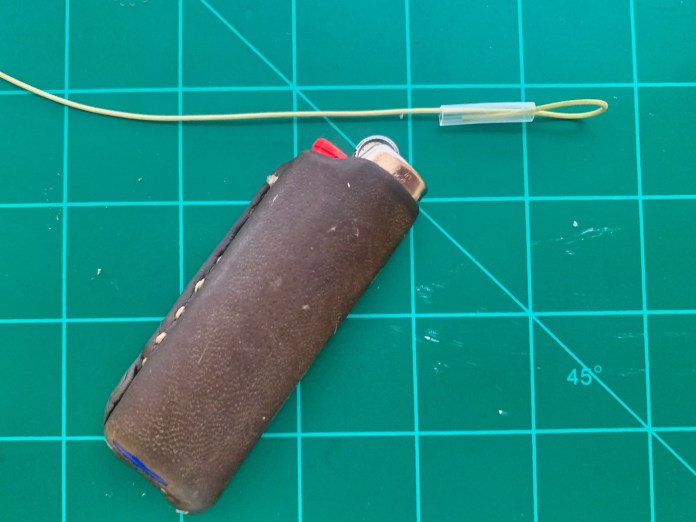
Tip: To avoid avoiding burning your fly line, wrap the exposed line and new loop in aluminum foil before applying heat.
A heat gun is ideal but a lighter works just as well.
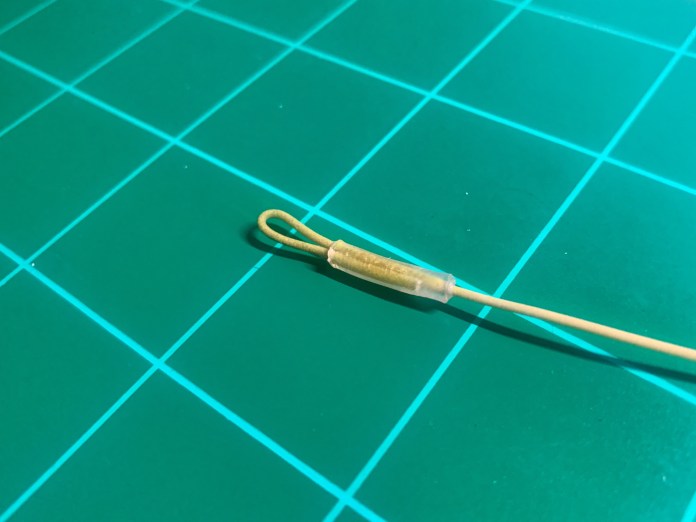
5. Apply heat until the tubing adheres to your doubled-over fly line. Note, there’s no need to touch the tubing with the flame.
The end result after gently applying heat with a lighter.
Stress Test
Like any knot, be sure to strength test the work that you have done. It’s much better to uncover shoddy workmanship now than when you have the fish of your dreams on the line.
Repairing your line is a way to extend your day, trip, and life of your fly line. The method shown above is great for on the spot repairs. You can easily carry a piece of heat shrink tubing and a lighter in your vest or pack. There are other methods of repair involving whip finishing a new loop with epoxy which may be a better long term solution and for chasing large fish, however, this method has yet to fail me in pursuit of trout. As previously mentioned, regardless of how well you take care of your line, it will eventually crack with time, sun exposure, and abuse. Hitting the water with a fresh line is always the best choice when your line is showing signs of use but this DIY trick should help extend the life of the line you already own.Â
Article by Evan Garda, he is on the Content Team here at Fly Lords. He can be found chasing trout throughout the west with his trusty fly rod. Check out his adventures at @evangarda.
BOZEMAN, Mont. (Aug. 5, 2020) – Simms Fishing Products, the preeminent manufacturer of waders, outerwear, footwear, and technical apparel in fishing, today debuted its Fall 2020 product line. The versatile product collection includes cutting-edge technical apparel built to meet angler demands in all environments and conditions. Highlights include expansion in both Simms Challenger and ProDry™ outerwear categories, an insulated ExStream collection, Riparian Camo, and an all-new Dockwear lifestyle collection.
“From the Women’s Challenger suit to the technical Riparian camo line, the Fall collection offers a wide variety of performance-driven products that will keep anglers dry and on the water longer,†said Casey Sheahan, CEO of Simms. “I’m incredibly proud of our team for developing an innovative and exceptionally designed collection that appeals to anglers across the country.â€
The Fall 2020 product assortment reflects Simms’ commitment to producing the most groundbreaking gear that’s built to fish harder and go farther. The carefully designed collection utilizes GORE-TEX®, TORAY®, CORDURA®, and other high-performance materials to reinvent comfort on the water.
In July 2020, the all-new Women’s Challenger Jacket and Bib were awarded Best Women’s Lifestyle Apparel in the ICAST 2020 New Product Showcase. The complete line is available now in select retail stores and online at http://www.simmsfishing.com/.
New for Fall 2020, the Dockwear collection features a variety of lifestyle equipment and outerwear pieces. Built with extremely rugged CORDURA® nylon, the Dockwear outerwear pieces include the Dockwear Jacket, Hooded Jacket, Vest, Pant, and Insulated Cap. The Dockwear Pack and Tote offer classic function and durable use to meet the needs of anglers, captains, and water-based enthusiasts everywhere. Rooted in Simms’ fishing DNA and balanced with angler inspiration, these pieces fulfill the need for go-to carry solutions, equally at home, at the ramp, brewery floor, boardroom, and beach.
With long time partner, Veil Camo, Riparian Camo is the next evolution of scientifically driven concealment built to keep anglers in tune with the natural world. The Riparian Camo collection features the Men’s G3 Guide™ Stockingfoot wader, both G3 Guide™ Tactical and Bulkley Jackets, ExStream® Foldover Mitt, Infinium Neck Gaitor, and Rain Cap. The new Riparian Camo pattern allows natural breakup with both large and small shape distortion that’s randomized and blended to perform at any distance, with a color palette tuned to North American freshwater environments.
The ExStream collection offers a superior warmth-to-weight ratio and stitchless quilted construction for optimal durability, making this thoughtful collection perfect for anglers layering under waders or bibs. The ExStream collection uses small, silky plumes of synthetic fiber, fused with silica aerogel to mimic the lightweight warmth of natural goose down. Not only does PrimaLoft® Silver Thermoplume have a long-lasting water repellent finish, the ExStream collection is constructed with DWR treated Nylon water shedding fabrics. The special blend of fibers delivers superior compressibility and the ExStream Jacket styles come with a dual slider self-stowing pocket for easy storage.
New for Fall 2020, the Gear Transport System is designed for all anglers who seek a solution for gear protection and transport, to and from their fishing destination. GTS is a collection of cohesive products, built from burly materials and thoughtfully organized to merge seamlessly together. The new pieces within the collection include a 100L Roller, 80L and 50L Gear Duffels, packing kits, and rod & reel vaults. Be it land, sea or air, this is the go-to kit for all fishing travel needs.
Simms is proud to release the first ever technical rain suit, specially designed by and for female anglers. Constructed with a waterproof/breathable 2-layer Toray fabric and a women’s specific fit, the Women’s Simms Challenger suit delivers comfort, and technical performance throughout. The jacket features an adjustable hood, a center-front zipper with a waterproof storm flap, a chest pocket with a built-in sunglass chamois, and handwarmer pockets. The bib comes equipped with a pass-through handwarmer pocket, plier port, and knee-high zips for easy on/off. Jacket and bib sold separately.
The Dockwear Hooded Jacket combines a durable CORDURA nylon face fabric treated with water-shedding DWR and a warm brushed flannel lining for a rugged, yet stylish piece. The YKK Metaluxe zippers and rubber-coated snaps are just a few of the thoughtful, angler friendly details that make this jacket one of a kind. The jacket also features 100g of insulation throughout the body, hand and interior pockets for storing essentials, and an insulated hood with a quilted lining.
For anglers who refuse to let wet conditions impede their fishing, Simms’ all-new Pro Dry Jacket and Bib is their foul weather fortress. Built with the most performance-driven fabrics in the GORE-TEX portfolio, the new Pro Dry Jacket & Bib are more durable and waterproof than ever. The jacket features tons of on-body storage, shingle cuffs to lock water out & a newly designed hood built for speed. The jacket and bib are sold separately, but when worn together, the weather doesn’t stand a chance.
You heard that right … New Belgium just announced that Fat Tire Amber Ale is the world’s first certified carbon neutral beer!
New Belgium Brewing (the makers of the famous Fat Tire) has always dedicated their company to creating a more sustainable world. While this has been a key part of the company’s ethics, they just took their commitment to sustainability to a whole new level.
Today, August 7th, 2020 (International Beer Day), New Belgium announced that Fat Tire is now America’s first and only certified carbon neutral beer – and they’re committing all of New Belgium to carbon neutrality by 2030.
Courtesy of @kirkymarks
New Belgium believes that “without healthy rivers, forests, and soils, it’s impossible to brew great beer. For nearly thirty years, Fat Tire has been working to reduce its impact and protect the land and water that make great beer possible. Today, on International Beer Day, Fat Tire is now proud to say it is America’s first certified carbon neutral beer.”
To learn more follow @fattire, grab a fatty, and #drinksustainably
One of our guides Wayne Paxton was capturing the moment when they stumbled upon this fish. On our spring creeks, Japanese beetles become very thick along the streamside vegetation in late June/early July. By the middle of July, the fish tune into them and ravenously chase them down. As fish become pressured by anglers eating beetles they will begin to inspect flies and become increasingly selective.
One trick we have learned over the years is that a presentation casting upstream on a slow-moving spring creek to a big trout can result in a very long inspection of a fly that will often end up in a refusal. The ’splat’ of these beetles hitting the water can produce a ‘charge’ of a fish from an undercut, off the bottom, or from way upstream. We noticed that fish that turn downstream from the resulting ’splat’ tend to find the fly and eat vs refuse.
That is why Wayne instructed his angler to cast 1st to the tail of the fish. When the fish did not react, they went to an angle just outside the fish. As you can see he hears it, engages, and almost sips…had the fish not been able to get downstream of the bug to inspect, he may just have sucked it down and turned to head back home…..
Andrij Horodysky, a Virginia local has created this beetle imitation for the creeks in this area. This has been an excellent addition to our terrestrial arsenal.
Article from Colby Trow of the Mossy Creek Fly Fishing, check them out on Instagram @mossycreekflyfishing.
It’s the dog days of summer, early mornings, long days, and rising water temps are leaving some of us longing for fall or winter days to avoid the heat. Well, Ben Sittig ditched the trout streams and headed down to Louisiana to chase the heat, some Lone Stars, and a few redfish.
So during that midday lull or that lunch break avoid the heat, sit down, and watch Ben try not to trout set on some Louisiana Redfish. And remember to Stay Huge!
If you fish rivers sooner or later you will come across this situation, you have to cast with obstructions around you, no backcasting room, or longer distances than you could with a single-handed rod and a haul or two. Enter Spey casting, long rods designed to be cast with two hands offering the best solution to your problem at hand. Two-handed casting has been around as long as single-handed rods, but other than salmon and steelhead applications, they were not used by non-steelhead or salmon anglers until recently. Double-handed, Switch, and Single-Hand Spey setups have made a resurgence, as lighter and shorter rods enter the market designed for more diverse fishing applications.
As with learning any new skill, two-handed casting comes with its own learning curve and terminology. Terms like “shooting head”, “running line”, and the variety of tips can get quite confusing to the uninitiated. What’re “D†loops, Skagit lines, Scandinavian (Scandi) lines? you may be asking yourself while staring at a fly shop wall. Even the casts have odd names like; the Perry poke, double Spey, single Spey, Snap “Tâ€, Circle “Câ€, Snake Roll, and Dragon Roll to name a few.
If you want to jump into the world of two-handed fishing, you can do it one of two ways: 1) purchase a Switch/Spey rod or, 2) Use the rod you currently have and turn it into a single hand Spey simply by changing your cast and line. Today we will be breaking this down into simpler terms so that you have more options to fish in different conditions and situations.
Single Hand Spey
Single hand Spey fishing is the best way to get started and is a budget-friendly option when diving into this awesome way to fish. You only need to purchase a few things, as you likely already have the most expensive part, a single-handed rod. The single-hand Spey game is the easiest to get into, as you just have to learn a few casts, most of which you probably already know. Basically, if you can roll cast, you can single hand Spey.
There are two ways to set up a single hand Spey rod 1) the head system, or 2) an integrated line. Both have their advantages (distance, easier casting, fishing with no back-cast room), and disadvantages.
The head system will give you more options of changing a multitude of lines down the road (with one rod you will be able to fish various methods) and with a mono running line, you’re casting distance will increase dramatically. However, some anglers don’t like the loop-to-loop connections going through their guides, which can increase the odds of the line getting stuck on the way out of the rod, resulting in funky casts or lost fish.
The integrated line has the same advantages, except you won’t get the distance that the head system gets, you can’t change out multiple lines and may need a larger reel or spare spool as the lines are thicker than your standard 5 wt floating lines.
The set up takes a few extra pieces, but it’s worth the effort. So, let’s learn some terminology that will help you decide your set up. To keep it simple, the best way to get introduced to Spey is a Skagit head. This can be confusing, but luckily, companies like OPST, SA, Rio, and Airflo have made it easier than ever for everyone.
The set up for ultimate versatility
The shooting-head (a.k.a. Skagit head) is the actual line creating the cast, a thick piece of short fly line anywhere from 12-20 feet. It comes in various grain weights to match the size of the rod (e.g. a 5wt is 200 grains and is 13 ft long) and requires a running line and tip to cast properly.
Running lines are different diameters and lbs test, mono, or level fly line that attaches to the backing on one end and the shooting head on the other. Brands such as Rio, OPST, S.A., and Airflo all have good options. Some have loops built-in and others need you to make a loop to loop connection with perfection loops. A monofilament running line gives you more distance and takes up less room on your reel, however, some don’t like the feel of mono and opt for a running fly line instead.
With regards to your line head, you will attach a tip; a piece of sinking fly line in various grain weights, with different types of sink rates to achieve different depths or presentations to your shooting head via a loop-to-loop connection. These can range between 5-12 feet in length. I have found that OPST, Rio have the best options to fish various water conditions and depths.
Integrated Lines are a good option for those who do a little of everything and don’t want the mess around with the running line or loop-to-loop connections going through their rods. All the buyer needs to do is pick up an appropriate size line (matching your rod) from your favorite brand add a tip or a leader, and hit the water.
I know initially, it sounds confusing; however, it is that simple, a running line, a shooting head, and a handful of tips. It’s the ultimate combination where adaptability is concerned and allows the angler to carry one rod and switch quickly from dry flies to streamers and everything in between, simply by changing the head, tip, or both.
With this set up it’s as close to getting a new rod without actually getting a new rod. So next time you’re looking for a new challenge or approach to your trout water, take out your standard trout rod, add the line system and hit the water.







![Trout Refuses Beetle Fly [VIDEO]](https://i0.wp.com/theflylords.com/wp-content/uploads/2020/08/mohawk1.jpg?fit=696%2C516&ssl=1 "Trout Refuses Beetle Fly [VIDEO]")


